Hi,
I love this funky stamp from Penny Black and decided to use her to make a Christmas card in non-Christmassy colours.
To create the snowflake background, I used the Snowflake Layer svg file - cutting it out from black card on my cricut. I layered the card onto pink pearlised card which makes the snowflakes really pop!
I stamped her on white card and coloured her with Promarkers. I stamped her again on the pink card and cut out her hat and dress.
She is matted and layered using Spellbinders Nestabilities Labels Twenty.
To give her a bit more glamour, I used some Creative Expressions ribbon behind the sentiment which is die cut using Spellbinders Fancy Tags Two.
The flowers around the frame were cut from Creative Expressions Sheer Woven Rosettes ribbon and embellished with crystal hat pins from our embellishments range.
Hope you like her!
xxxx
Sunday, 31 July 2011
Friday, 29 July 2011
Spiral Roses Tutorial
Flowers and roses are everywhere at the moment, and I love them! Although they look very complicated on a card, they are so quick and easy to make.
At Crimson Cloud, we supply the spiral circles either as an SVG file for your Cricut, or as a pack of 6 die cut from pearlised card in lilac or cream.
You start off with some card or heavy paper cut in a spiral circle.
The ones shown below are 3 inches wide and will make a flower about 1 1/2 inches wide.
To give your flower the distinctive petal effect of a rose, take the spiral and bend it in half along the whole length until you reach the middle. It should look like this -
Then, taking the outside edge of your spiral, roll it up length ways. It can be a bit difficult to get started, but you soon get going. When you reach the centre, tuck it under the spiral. When it is all rolled up it should look a bit like this -
If you let go of the flower, the spiral relaxes a little to give looser, more open look. I use a large sticky dot to stick the centre to the back of the rose - it seems to hold it quite well.
Once I had made my flowers, I decided to use them as Christmas roses. I added some bling by setting a gem at the centre of each rose - what do you think?
Mel xxx
Wednesday, 27 July 2011
Oriental Inspiration
We have been very flattered to have been credited for inspiring a fellow crafter. If you have time, have a look at Victoria's blog where she has made some beautiful cards.
xxx
New Range of "Make Your Own Card" Kits
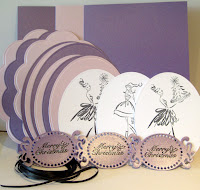
We have just launched our new range "Make Your Own Card" kits. These kits are ideal for beginners or for more experienced crafters who are in a hurry. We have kits for Christmas, weddings, anniversaries, men, women and children.
Have a look at our gallery for ideas on how you can further embellish your kit with a little imagination and a few extra products.
I would love your feedback on these kits.
xxxx
Have a look at our gallery for ideas on how you can further embellish your kit with a little imagination and a few extra products.
I would love your feedback on these kits.
xxxx
Monday, 25 July 2011
Penny Black Christmas Star
The theme to this week's Penny Black Saturday Challenge was "Stars".
I wanted to use the Penny Black snow globe stamp (Sending Love) as I think this stamp is so versatile and can be used for so many styles. I used stamps from the "Jolly Friends" clear stamp set to create my scene in the globe. To create the glassy effect of the globe, I used crystal transparent embossing powder to triple emboss. Some ribbon, some star embossed and patterned paper and a star tag and the card was complete. Hope you like it! xxx
I wanted to use the Penny Black snow globe stamp (Sending Love) as I think this stamp is so versatile and can be used for so many styles. I used stamps from the "Jolly Friends" clear stamp set to create my scene in the globe. To create the glassy effect of the globe, I used crystal transparent embossing powder to triple emboss. Some ribbon, some star embossed and patterned paper and a star tag and the card was complete. Hope you like it! xxx
Friday, 22 July 2011
Penny Black Saturday Challenge
I decided to try my hand at some paper piecing for the Penny Black Saturday Challenge. The challenge was to use a Penny Black stamp and a banner somewhere on the card. I used the Penny Black La Soiree stamp. Once I had stamped the image onto white card, I also stamped it onto coordinating patterned paper and cut it out to make her dress, handbag and balloons.
I used the Spellbinders Banner Basics to cut the patterned banner and glued the banner onto embroidery thread. I cut an aperture in the card and a frame from patterned paper using Grand Nestabilities to give the card some depth.
To finish the card off I stamped and cut out the sentiment and used some gems to decorate the banner.
I had great fun making this card and really like the girly pink colour scheme.
xx
Thursday, 21 July 2011
New Cricut Range now in stock
We have just added a fabulous new range to Crimson Cloud.
We now stock the Cricut Expression machine and a wide range of Cricut cartridges.
These cartridges are fantastic value for money and a great addition to your crafting tools.
The Crimson Cloud SVG file downloads also work with the Cricut Expression giving you even more die cut shapes to use on all of your projects.
Check out our gallery for ideas on what to make with your Cricut cartridges.
xx
Monday, 18 July 2011
Mystical
Hi
I made this card a couple of weeks ago and then forgot all about it!
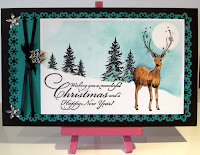
This beautiful Stag and the sentiment stamps are from Penny Black and the trees in the background are from Clarity Stamp.
The main techniques used are brayering and masking. I stamped the stag onto gloss card with Memento ink so that I could use my Promarkers later on without smudging the ink. I then masked him and tore some paper to create the snowy ground. This was over stamped with the Sprucescape stamp giving the impression that the trees were behind the hill. I placed a cut out moon over the stag's antlers, and then brayered in the sky. Once I removed the masks and I was left with the completed scene so I could colour the stag and trees with promarkers.
The scene was easily mounted onto card edged with Martha Stewart punches and ribbon threaded through to give extra texture.
Mx
Monday, 11 July 2011
Crooked Picture Frame
Digi-stamps are a really economical way of increasing your stamp library and are as versatile as regular stamps - if not more so.
I made this card by printing out the Birch Tree Scene digital stamp and painted the background with Creative Expressions Cosmic Shimmer Drawing Inks. The frame was cut from some beautiful copper card using Spellbinders Nestabilities Lattice Rectangles and then mounted onto a blue background which was embossed using the Creative Expressions Bark Embossing Folder.
You can change the colours to create a completely different mood or time of day.
We would love to see how your imagination has used the image.
Linda xxx
Monday, 4 July 2011
Creative Expressions Calling Card Challenge
Creative Expressions have a design team call out at the moment - which I thought would be fun to enter!
The rules were to make anything you like as long as the project included some stamping and an ATC.
Here is my entry -
This card is simpler to make than it looks although it took quite a bit of time.
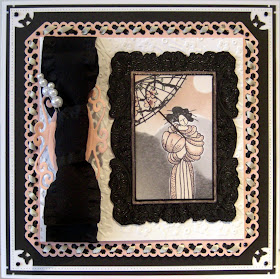
I decided to turn my ATC into a Geisha Scene and then frame it. To do this, I stamped the Geisha and parasol in Memento Ink (Tuxedo Black). I then stamped them both onto Eclipse masking tape and cut them out to create masks. I also punched out a small sun from the masking tape. Once the masks were placed over the Geisha and Parasol, by tearing a sheet of copier paper, I created a "mountain" mask. Placing the mask over the picture, I brayered over with Black Soot Distress Ink to create the first mountain, and repeated lightly to create another mountain in the background. I left a bit of white at the top to give the impression of snow on the mountain. I repeated this with the Tattered Rose Distress Ink to create the pale pink of the sky. The Geisha and parasol were coloured in with Promarkers and Copics - Almond, Pale Pink, Pea Green and Egg Shell.
Once the ATC was created, I stamped and embossed in black the frame, cut it out and highlighted the inside of the frame with Cosmic Skin drawing ink.
To make the background, I embossed white card with a cherry blossom embossing folder and matted it onto pink card which had all four sides punched with an edger punch. I then spent an hour threading black and pale pink ribbon through the holes - time consuming but very therapeutic :-)
This was matted onto black card which was corner punched with a butterfly punch. More matting and layering onto white and black card.
To create the embellishment, I die cut a ribbon buckle using Spellbinder Fancy Tags Three with a small circle cut out the middle. Using ruffled edged ribbon, I threaded it through the "buckle" and tied a big bow. This was mounted onto the card, embellishing with two beaded hat pins.
I thoroughly enjoyed this challenge - why don't you give it a go? Details on how to enter are here.
Good luck! xxx
Did you miss out on Barbara?
Hi Everyone,
The amazing Barbara Grey was on Create and Craft for three hours yesterday - what a treat!
She was showing off her range of Christmas stamps and techniques. As usual most of her products were a sellout before the shows were over. So if you did miss out - we have lots of her Christmas stamps in stock.
As well as Barbara's beautiful stamps, we also stock Christmas stamps from Penny Black and Hero Arts and will soon have the new Creative Expressions Christmas stamps in stock.
xxx


