Thursday 30 May 2013

Hatty Stamps

This week we are showing off our new design team's first set of samples.

They used two sets of stamps which go well with the current Great Gatsby trend.

Tipped Hat Stamp set and sentiments


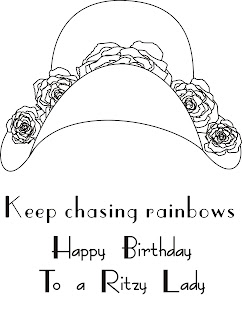
Tipped Hat with Roses Stamp set and sentiments

And here are their beautiful creations! (If you click on the pictures you will be linked to their blogs)

Cheremane Smith

Lisa Stephen 

Debs Artliff

Sandra Carey
And here is the latest Crimson Cloud sample using the Tipped Hat with Roses stamp set


I hope you like these newest samples. Check back in with us next Friday for the new batch of ideas!
Mel xx Pin It Now!

Friday 24 May 2013

Introducing our new Design Team......

We are delighted to introduce the new Crimson Cloud Design Team! They will be demo'ing our exclusive range of Crimson Cloud stamps over the next six months.

The new Design Team are -

Cheremane Smith

Debs Artliff

Lisa Stephen 
Sandra Carey
Click on their names to visit each of their blogs.

We can't wait to start working with our new team.

Check back in next Friday when we will be showing off their first set of samples.

Mel x Pin It Now!

Free Postage on Crimson Cloud .....


to celebrate the Bank Holiday Weekend we are offering free postage on all orders over £5 until midnight on Monday.

Click here to go shopping!
Pin It Now!

Thursday 23 May 2013

A Magical Day - Crafty Tales from the Wilderness


It is a beautiful sunny autumn day in The Wilderness. We decide to go for Sunday lunch to a little restaurant overlooking the beach. On our way down the drive we stop the car so that I can go into the woodland to see if my eyes are playing tricks on me. 
I am thinking “I have spent far too much time designing fairies and it is obviously getting to me”. 
But no, sure enough when I get up close it is exactly as we thought - a giant fungi growing out of a rotting tree stump. It is bright yellow and at least 16” in diameter and I would guess 4” high. 


A spectacular specimen the likes of which I have never seen before.  Crouching over it I stroked its surface which was as soft as velvet but probably highly poisonous. Must remember to wash my hands before we eat!!
I am amazed at the beauty of nature’s gifts.

We enjoy lunch, and of course a bottle of wine, feeding our eyes and ears at the same time with the sounds of the ocean and the sight of a school of dolphins playing in the surf.

Returning home and feeling rather sleepy I relax on the veranda for a while in the late afternoon sunshine. Marcus has gone to the office and the trio of dogs accompany him.
Feeling a little guilty at all this indulgence it maybe is time to be a little productive. Leaving the door open I go inside to deal with some really boring stuff like tax rules and regulations. Whilst deep in concentration and correspondence with an online consultant, out of the corner of my eye I see movement. As I turn around there is a visitor - Pete the Peacock. To explain, Pete is a wild peacock who walked onto our property on Boxing Day a few years ago and has turned up every day since for a dinner of sunflowers seeds.


Today he has decided he has waited long enough for his supper and is coming into the house to investigate. I ignore him for fear of giving him a fright especially as the floor is very slippery and he has chicken feet - not a good combination.

He walks around to the other side of the breakfast bar and barks at me. Now for those of you who have never communicated in the language of “Poc”, it is a very,very loud shrill noise. My house has a high ceiling which makes for wonderful acoustics. It was so loud in the otherwise silent house that I almost fell of my stool. Gloating on his newly found power he would not shut up until I went to fetch his feed and lured him back outside.

It is probably safe to say that I now know where I am in the pecking order, if you will excuse the pun.

Linda xxxx
Pin It Now!

Tuesday 21 May 2013

Dabbling in Distress Paints.....

The new range of Tim Holtz Distress Paints have arrived at Crimson Cloud and we have been dabbling with them all day. These are no ordinary acrylic paints! Not only do they blend beautifully when wet, when they are dry they stay put. Which means you can put layer after layer on until you are happy with your result.

I put together a couple of projects today using the Seedless Preserves, Picked Raspberry and Spun Sugar distress paints.


And here are the two projects -


 I took a piece of heavy weight cardstock and dabbed the colours on - making sure I used the lightest colour first. I then spritzed the card heavily with water (you could use a pearly mica spray here) and moved the card around so that the paint spread and blended. I used my heat tool to dry the paint, and then dabbed any excess wet paint from my craft mat onto the painted card to add texture and interest.

I cut the cardstock in half to create two panels for my two cards.

For the Dreams card, I embossed my panel with the Sizzix Birds and Lace embossing folder


 and sanded the embossed impression to reveal the birds and flowers. The sentiment came from the Creative Expressions Birds stamp set


To create my second card, I embossed a piece of white cardstock with the Creative Expressions Bark embossing folder


I used one of the brand new Couture Creations Ivy Doilies and die cut it from my second panel of painted cardstock

 The sentiment comes from the exclusive Crimson Cloud Sitting Fairy stamp set


I am now off to clean up the paint splatters from all over my craft room - even my lap top keyboard has some suspiciously pink fingerprints on it!
Mel
xxxx Pin It Now!

Friday 17 May 2013

Happ-bee Birthday and Design Team Call Out

First of all thank you to everyone who applied to our Design Team Call Out. We will be introducing the new team members shortly - we can't wait to start working with them and seeing some new ideas for our stamps.

And speaking of Crimson Cloud stamps......


This card was made using two stamp sets from the latest release -

Bee Sentiments


and Textured Buttons

These A6 stamp sets are super-versatile. The button stamps come in two sizes - to fit a 1 inch punch and a 3/4 inch punch. The buttons are made up of different patterns and textures and even include faux button holes and stitching.

The Bee Sentiments stamp set is made up of hexagons which fit the Spellbinders Hexagon dies, and even include a little bee and a row of dots to show his flight path.

To create the card, I die cut 5 hexagons from cream card and overstamped with the basket weave stamp. I arranged them on my Kraft card topper and trimmed the edges to fit.

At the top of the card, and on one of the hexagons I stamped the flying bee with his little trail of dots.

I stamped out my sentiment and cut it into a little banner which I decorated with one of the small buttons from the Textured Buttons stamp set.

I mounted my topper and sentiment banner onto a cream card base and doodled around the edges with a brown pen.

Hope you like it! xxxx Pin It Now!

Friday 10 May 2013

Crimson Cloud Design Team Call Out - only one week left to enter....


Hi Everyone,
Just a reminder that there is one week to go on the Crimson Cloud DT Callout - all entries must be in by Friday 17th May - good luck!
Mel xxx


Crimson Cloud are creating design team and are looking for enthusiastic and inspiring papercrafters to help promote their exclusive range of clear stamps.

You will need to have -
- an active blog
- a Facebook account
- a Pinterest board showing your designs

You would need to be able to commit to
- the design team for a minimum of 6 months
- making one or two projects per month
- promoting Crimson Cloud projects on your blog/facebook and pinterest and other social media

The benefits are -
- Free stamps supplied to make projects (two projects required per stamp set)
- Your name and link to your blog displayed on the Crimson Cloud blog
- Your Crimson Cloud projects promoted on our Facebook page, Pinterest board and Blog
- 10% Discount off Crimson Cloud products for the duration of your term.

To enter -
- become a follower of the Crimson Cloud blog and leave a comment on this post
- "like" us on our Facebook page

and....

Please submit one of your recent papercraft projects by email (sales@crimsoncloud.co.uk) - under the subject heading "Design Team Call - April 2013"
- Tell us if you are on any other design teams (you don't need to be!)
- Give us your blog and facebook links and links to any online galleries you may have
- include a short paragraph on your style and the type of projects you like to make and why you would like to join the Design team.

Entries must be submitted by Friday 17th May 2013.

We look forward to seeing your entries!
Mel and Linda xxx
Pin It Now!
Wednesday 8 May 2013

Hola, Bonjour, Hello....

 For this card, I decided that I wanted to use the Hero Arts Cats and Dogs clear stamp set in a totally different way - by leaving out the Cats and Dogs!


I stamped the green card blank with the Hero Arts Arrow background cling stamp

using Versamagic ink and set aside to dry.

There is a really cute speech bubble in the Hero Arts Cats and Dogs stamp set

which I stamped onto three different shades of green cardstock.
I stamped the three greetings into the speech bubbles and cut them out by hand.

I arranged the speech bubbles on my card front until I was happy with the positioning. The Hola was glued flat to the card, the Hello was mounted on one layer of foam tape, and the Bonjour was mounted on two layers of foam tape - so that the speech bubble overlapped each other nicely.

Using a selection of green buttons from my stash, I glued them in between the bubbles to add interest and texture.

I think this is a quick, fun card which could be sent to anyone!
Mel xxx

Pin It Now!

Sunday 5 May 2013

Hot Dog, Its your birthday!

I have been having a great time playing with the new release from Hero Arts.


This cute card was made for a dog lover using the Hero Arts Cats and Dogs clear stamp set


I started with an A6 Kraft card blank. I cut some cream card stock slightly narrower than the card blank for my front panel. I stamped my birthday sentiment directly onto the card blank in Rich Cocoa Memento.

Using a Spellbinders square die (you could use a punch here) I cut an aperture into the cream front panel.

On a spare scrap of the  cream card, I marked in pencil the shape of the aperture. Using the pencil marks as a guide, I stamped out my little scene, first stamping the silhouettes of the dogs in a pale brown, then overstamping the outlines of the dogs in a darker brown. I blended a little ink under their feet to ground them and stamped the "Woof!" sentiment in dark brown.

Taking my original cream panel, I tied a piece of twine through the aperture and round the outside edge, finishing it with a button. With some foam tape, I attached the doggy scene behind my aperture and mounted the whole panel to the card front.

Really cute I think - and can be repeated with the cats from the same stamp set for cat lovers.

Mel xx Pin It Now!

Wednesday 1 May 2013

Birds of a Feather .....

This card was made for today's CRAFT challenge.


The theme was sewing/stitches, and as you can probably gather from my submission - sewing is not my strong point!

To start, I took a white card blank and stamped it with the Hero Arts Arrows cling background stamp in Versamagic ink (Wheat). This ink gives a lovely subtle background.

I set the card blank aside to dry.

Using the new Hero Arts clear stamp set "Sundrifter Love This" I stamped the circle onto a strip of Kraft cardstock and embossed with white embossing powder. I stamped and embossed three feathers onto the circle to give the look of a Dreamcatcher.

At the top and bottom of the circle I stamped "you" and "me" in Memento Rich Cocoa.

To create the scalloped bottom edge I used Spellbinders Labels Thirteen.  I trimmed the Kraft cardstock slightly narrower than the die so that I could slide just the bottom of the card under the cutting edge and die cut it.

I took some scrap vellum and stamped and embossed my sentiment. I trimmed the vellum to fit the width of my Kraft panel. Using some repositionable glue, I positioned the vellum on the Kraft panel and poked some stitching holes with a piercing tool. I then used these holes to sew my vellum strip onto the Kraft cardstock.

To decorate, I used some twine, a wooden button and some 3mm white pearls from Creative Expressions.


I attached the panel to the front of the card with foam tape.

I hope you like this card, with its neutral colours I think it is suitable for a man or a woman.
Mel xxx


Pin It Now!