This is one of the fastest cards that I have made in a long time - sometimes it just all comes together the way you want it!
I embossed some Whitewash Coredinations with the Couture Creations Ascension embossing folder
I did this twice and then cut out the hot air balloons to use as embellishments.
I then embossed some white cardstock with using the Replacements embossing folder
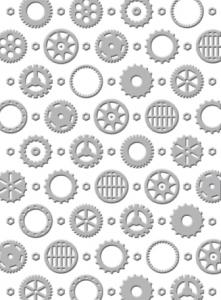
This folder works well as cloud-like background.
I stamped the sentiment in black Memento Ink underneath the embossed panel.
I tied a bow with Teal Vintage Ribbon
The topper was matted and layered onto an A4 black card blank.
Hope you like this one - it makes a great card for a man.
Mel xxx
Pin It Now!
Thursday, 12 April 2012
Quick and Easy!
Labels:
ascension,
couture creations,
Creative Expressions,
Crimson Cloud,
replacements,
vintage ribbon
Saturday, 7 April 2012
Blog Candy Winner
Hi everyone
The lucky winner of the anniversary blog candy is Tigger78 - congratulations! Please email me your postal address so that I can post your prize.
Thank you everyone for your comments - we will be posting some more blog candy soon!
xxx Pin It Now!
The lucky winner of the anniversary blog candy is Tigger78 - congratulations! Please email me your postal address so that I can post your prize.
Thank you everyone for your comments - we will be posting some more blog candy soon!
xxx Pin It Now!
Monday, 2 April 2012
For a Swell Gal!
This month we were lucky enough to have a project printed in Craft Stamper.
We, like many people, including the movie and TV industry, seem to be fascinated with the 1920's and 1930's. This time of subtle glamour is illustrated by shows such as Boardwalk Empire and the movie "The Artist".
After some research we discovered that although there are many "roaring twenties" stamp sets and craft products on the market, there did not seem to be any large hat stamps - so we just had to create our own range!
We also wanted to celebrate the language of the era and so have included some fun sentiments to coordinate with the hats. We hope you like these new stamps as much as we do - we will be adding to the range soon.
In this project, I have tried to reflect the era in the colour tones - using muted browns and blues. I wanted the card to look vintage but not to grungy or girly. So unusually for me - no flowers, no gems and no big swirls - quite a challenge!
Mel xx
P.S. Don't forget to leave a comment on the post below to be in with a chance to win some anniversary blog candy! Pin It Now!
Labels:
Crimson Cloud,
hat stamps,
just rite,
lattice embossing folder,
pearl glues,
vintage ribbon,
wrinkled edge ribbon
Friday, 23 March 2012
Anniversary Blog Candy
Time flies as we all know, days become weeks, months become years - but still it never ceases to amaze me.
xxx Pin It Now!
The 23rd March is the 1st
Anniversary of Crimson Cloud. We would love you to celebrate along with us by
joining our blog and hopefully becoming the lucky recipient of our
Blog Candy Stash which includes:
2 sets of brand new clear stamps - exclusive to Crimson Cloud
2 yards of wrinkle edge ribbon,
1 yard of ribbon rosettes,
3 yards of vintage ribbon,
1 pack of handmade paper roses,
1 pack of triple layered butterfly
embellishments
Spring and Easter are just around the
corner and this little goodie bag is perfect for the season.
For a chance to win the first anniversary blog candy, become a follower of the blog, and leave a comment on this post by Friday 6th April. The draw will take place on Saturday 7th April.
Good luck to you all and thank you for your
support during the last year.
Cheers!
xxx Pin It Now!
Monday, 19 March 2012
Sweetie, if you're not living on the edge, you're taking up space!
I love these colours, they are so bold - as is the sentiment. Typical of the ‘Roaring Twenties, a time to be bold!
The Cloche Hat and sentiment are from our Hats and Roses Collection:
I stamped and embossed in black to give a lacquered look and cut out and embossed two squares in black card, and one in beige card. I stamped the hat out again (or like me you can use the first one which didn’t work out so well!) I then cut out the flowers and painted them using Cosmic Shimmer Dazzle Paint (Rich Gold).
The tri-fold card base was made by using an 8 inch wide piece of card, with both sides folded in at two inch intervals to meet in the middle.
Decreasing increments of co-ordinating papers brought some interest to an otherwise plain background.
The card was matted and layered - making sure that the top square panel was only glued on the left, and the bottom square panel was only glued on the right to ensure that the card can still be opened.
Using three different texture and widths of ribbon I tied a bow from which to ‘hang’ my pictures. The bow and hat pins
were stuck down with strong double sided Wonder Tape.
Finally I fastened the remaining painted flowers to the bottom of the ribbon - making sure I only attached them to one side of the card.
After a life time’s philosophy of ‘less is more’ I decided to finish the card with just a subtle touch of black glitter glue to the flower centres. Unfortunately at this point my card chose to face-plant itself onto the white sheet which it was standing to be photographed. But hey! Here it is.
Enjoy! Linda xx Pin It Now!
Saturday, 17 March 2012
Guess who arrived home with a new toy?
Hi Everyone
This is Linda - just back from my trip to the UK.
I have waited months to visit the UK to collect a Grand Calibur (as well as to visit some trade fairs, see the family and do some work of course) and to collect some of the wonderful new Spellbinder dies. Being the only woman on the planet, apparently, who has managed to break her Cuttlebug, it has been a long wait.
To celebrate I have made this very ‘blingy’ card
from one of our new range of hat stamps. There are four sets in total ranging from demure to sassy.
So, let’s begin with stamping the front tipped hat in black Memento as I coloured the roses with Promarkers . Then, feeling like a little girl on Christmas morning, I cut out 6 different sizes of the Spellbinders Grand Nesties Labels Twenty Three die
plus one extra of the largest to make the back of the card. This I folded about 1.5 inches down from the top and glued to the card of the same size. Using mounting tape I then layered them up - so quick and effective.
The Pearl Swirls were cut and stepped down the layers to give an illusion of 3D.
Then having cut a more Labels Twenty Three from the smaller coordinating Spellbinders set, I stamped the Happy Birthday sentiment from our Hats and Roses Collection.
Grey satin ribbon was fixed to grey sheer ribbon using double sided tape, and then a second strip of double sided tape applied to form the ruffle. I used a pencil to equalise the ruffle but that is because I am a little OCD!
Now the sentiment needs a little support so a small piece of the same card about .5”wide folded into three forms a perfectly disguised little support bracket, it worked a treat!
I hope you enjoy this new range of hat stamps half as much as I have enjoyed making this card with them. Now I must find someone really special to send it to!
Linda xxxx Pin It Now!
This is Linda - just back from my trip to the UK.
I have waited months to visit the UK to collect a Grand Calibur (as well as to visit some trade fairs, see the family and do some work of course) and to collect some of the wonderful new Spellbinder dies. Being the only woman on the planet, apparently, who has managed to break her Cuttlebug, it has been a long wait.
To celebrate I have made this very ‘blingy’ card
from one of our new range of hat stamps. There are four sets in total ranging from demure to sassy.
So, let’s begin with stamping the front tipped hat in black Memento as I coloured the roses with Promarkers . Then, feeling like a little girl on Christmas morning, I cut out 6 different sizes of the Spellbinders Grand Nesties Labels Twenty Three die
plus one extra of the largest to make the back of the card. This I folded about 1.5 inches down from the top and glued to the card of the same size. Using mounting tape I then layered them up - so quick and effective.
The Pearl Swirls were cut and stepped down the layers to give an illusion of 3D.
Then having cut a more Labels Twenty Three from the smaller coordinating Spellbinders set, I stamped the Happy Birthday sentiment from our Hats and Roses Collection.
Grey satin ribbon was fixed to grey sheer ribbon using double sided tape, and then a second strip of double sided tape applied to form the ruffle. I used a pencil to equalise the ruffle but that is because I am a little OCD!
Now the sentiment needs a little support so a small piece of the same card about .5”wide folded into three forms a perfectly disguised little support bracket, it worked a treat!
I hope you enjoy this new range of hat stamps half as much as I have enjoyed making this card with them. Now I must find someone really special to send it to!
Linda xxxx Pin It Now!
Labels:
Crimson Cloud,
grand nesties,
hat stamps,
memento,
nestabilities,
spellbinders
Thursday, 15 March 2012
The new Spellbinders dies have just arrived!
We have just had a delivery of the stunning new Spellbinders dies! No chance to play with them yet- so keep checking back for samples.
Here are a few of the new designs we have in stock -
Pin It Now!
Here are a few of the new designs we have in stock -
I will try to get some samples together and on the blog for you as soon as possible!
Mel xxx
Pin It Now!
Subscribe to:
Posts (Atom)


