Thursday 29 November 2012

Christmas Wreath


This week we entered the Trimmies Craft Challenge blog. The challenge was to use the picture above as inspiration for a paper project.

Just for a change, I decided to make something for the home rather than a card.

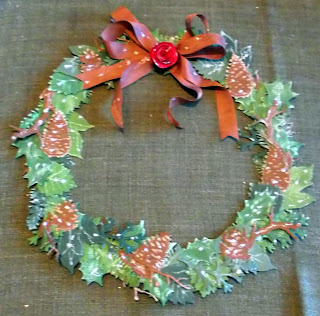
Here is my interpretation -


This wreath was very quick and easy to make using the Spellbinders Fall Foliage dies


Spellbinders Foliage dies


and the twigs from the Spellbinders Cherry Blossom dies

 Once I had die cut a big pile of leaves, pine cones and twigs from green and brown card stock, I sanded them a little to bring out the embossing  and glued them onto a cardboard ring.

The bow was created using the Creative Expression Vintage Ribbon - Amber Brown and adhered with a sticky dot


I used one of the Crimson Cloud paper roses to embellish the bow and some Stickles for added Christmas sparkle.

Hope you like it!
Mel x Pin It Now!

Friday 23 November 2012

White Elegant Stag


This little card is so simple and yet it does justice to the beautiful Elegant Stag  and pairs beautifully with the Woven Rosettes Ribbon.

To recreate it, you will need - 

Crimson Cloud Elegant Stag Stamp Set

Spellbinders Decorative Labels 8

Spellbinders Exquisite Circles


Woven Rosettes Ribbon 

Stamp & Bond
Fun Flock
Cosmic Shimmer Glue
Double sided tape
White cardstock

To start, cut a 5” x 5.5” panel from white cardstock.

Place the largest Decorative Labels 8 die onto another sheet of white card stock and tape down. In the top lefthand corner, place the smallest Exquisite Circle and tape down. Run through your die cutting machine. You should now have a label with a circular aperture and a left over small exquisite circle.

Cut a strip of the Woven Roses ribbon and stick with double sided tape to your 5” x 5.5” card.

Next stamp your Elegant Stag onto the Decorative Label in Versamark, apply Stamp & Bond then the Fun Flock.

Once this is dry go over the Stag with Cosmic Shimmer Glue using toothpick or brush to create lots of texture. Before it dries cover with the Pearl Glitter.

Do the same to the smallest Exquisite Circle which you used to create the aperture.

Create a card blank and mount your topper beside the roses placing your small glittered circle in place.
Enjoy,
Linda

Pin It Now!

Tuesday 20 November 2012

Mid Winter Festival


This card brings to mind a more of a mid-winter festival, rather than a traditional Christmas card.


To make this card you will need:

Crimson Cloud Language Background Stamp

Grand Nestabilities Large Labels

Spellbinders Cherry Blossoms

Spellbinders Fall Foliage 

Creative Expressions Cream Pearl Hat Pins

Cosmic Shimmer Glue

Cosmic Shimmer Embossing Powder- Lapis Black

Glitter glue
A piece of your favourite ribbon – optional
Mounting Tape
Silicone Glue


Here’s how:
Take half an A4 sheet of dark green card stock and cut an aperture with the size three Grand Nesties Large Labels die.

Cut another half of A4 in a contrasting green with the size 4 Large Labels die.

Fix one to the other and these form your ‘mount and frame’.

Stamp out the Languages Background Stamp with Versamark and emboss with the Lapis Black.

Take a new sheet of A4 Card stock in the dark green and fold in half. Centre your Language Background and fix to the backing card. Then use mounting tape to attach and centre your ‘Mount & Frame’ over the language backing.

Now you can play!

Cut out as many of the ‘Fir’ branches as you would like from the Fall Foliage dies. I used a whole sheet of A4 to make it abundant, then die cut some pine cones and acorns.

The twigs were cut from the Cherry Blossoms dies.

I had a piece of holly ribbon in my stash which I glued around and under the frame with Cosmic Shimmer Glue. You could use red or tartan if at all; it looks just as pretty without!

Decide on your lay out and fix with the glue. I used silicone inside the pine cones to give them some relief.

Lift the whole thing with some glitter glue and finally get out your hat pins.

I am very pleased with the result and I hope you will be too.

Linda xxx
Pin It Now!

Thursday 15 November 2012

Tact is not her middle name!

African Christmas Decorations

This is the first Christmas in my lifetime that I will spend without my darling sister Barbara.
She was a funny, nosey, homely, busy body, with an amazing sense of humour who wanted to be everyone’s Mum and to solve their problems. She died earlier this year and I am still reeling.

But I write not to dwell on my loss but to tell you of just one of the funniest stories she left me with and there are oh so many! 

This one is happened at Christmas so is rather poignant.

The Lodge I used to run was fully booked out with most of our guests arriving from the Continent.

As is a common continental European tradition, we would have a very formal dinner on Christmas Eve, followed by a more casual affair on Christmas Day - bearing in mind that at Christmas in South Africa the day time temperature is usually around 35 degrees and roast turkey and Christmas pud may be a little heavy. For this reason I would prepare a Christmas Day buffet and we would relax together with the guests including my sister and husband.

Being the busy body that she was, my sister wanted to know more about the guests. I gave her their names and nationality and told her that one room was booked out for two guys. As I was unsure of their relationship I decided to put them in ‘The Family Room’ as this had two beds! 

Butterfly Christmas Tree at the Lodge

As I carried the dishes to the table, I watched with delight as my poor sister squirmed with curiosity as she was under strict instructions not to ask guests personal questions.

One of the two guys came from Hong Kong where I had also lived for a short while so the conversation was flowing easily. His "friend" was the biggest man I have ever seen and came from Austria. He was sitting next to my sister who, by this time, was twiddling her fingers and casting side long glances to see if I was watching her.

“So, are you married?” I hear her say with my radar. 
"No" says the perfect gentleman from Austria.
“Oh, really?  Is your friend married?”  
“No”
“ Do you have children, either of you?”  Now I know she is on a roll. 

At this point I decide enough is enough and ask my sister 'to help me in the kitchen'.  

“What are you doing!” I ask her. She hung her head and eventually asks if the guys are gay. 
“I have no idea as it is not a question on the booking form!" I snapped "so please don’t interrogate the guests". 

Lodge Table Decorations


Feeling the air is cleared we both return to the veranda and our guests. Barbara returns to the Austrian guy and apologises saying "I am not allowed to ask you too many questions-  so are you gay?"

There was a deadly silence which exploded with the deepest belly laugh I have ever heard from the amazingly tolerant Austrian.

He came back the following year with his girlfriend and asked where is friend Barbara was.
Pin It Now!

Friday 9 November 2012

Christmas for Men


This is an option for the often "difficult to make for" men in our lives using the second tree in our Script Trees stamp set


I started by creating a card blank using red card stock.

Using patterned paper, I trimmed a sheet to fit the card blank and die cut a square aperture using the Spellbinders Grand Squares.

Using a silver coordinating card stock, I die cut another square to fit in the aperture and mounted onto the card front.

Using the free Christmas Tree SVG from Crimson Cloud I cut out 4 trees in increasing sizes. I started with 3.600” x 3.800” and increased with increments of .200” height and width. 

Recut the second and fourth tree from your pretty paper and attach to the card stock to give some substance.

I stamped by tree onto the top die cut in silver and layered up the trees using mounting tape and fixed to the front of the card.

I stamped and mounted the sentiment with foam tape for dimensions.
To finish I added a few silver gems to create a very pretty but also masculine card for a change.

Enjoy,
Linda xxx
Pin It Now!

Monday 5 November 2012

Spellbinders Die D-Lites

are now in stock!


Have fun with them!
xxxx Pin It Now!

Sunday 4 November 2012

A letter from Santa


Children love to write letters to Santa at this time of year, but as a twist we have designed a stamp which is a note from Santa.

Using the Crimson Cloud Christmas Tree SVG which is free this month, cut out 2 trees. The first is 3.600”w x 3.800”h and the second 3.85”w x 4.050”h. 


Then using the Crimson Cloud Script Trees Stamps


and either Dew Drop memento ink pads or Tim Holtz distress ink pens, ink up your stamp. If you use the Dew Drop pads use a piece of card to protect the line of the sentiment below the one you are stamping. 

Stamp this onto your smallest tree and then colour the backing tree and mount one to the other.

Cut a square 6.25” x 6.25” from white card stock and layer up with ever increasing squares die cut using Grand Nesties Squares.

Edge each square with a different coloured line around  to co-ordinate with your choice of colours.

Glue your trees to the centre and start to play with some matching gem stones.

Mount your topper onto a colour coordinated card blank.


Stamp out the Merry Christmas Sentiment and attach to a banner of your choice which you can colour the same as the larger tree. Mount up, more gem stones and away you go.

I hope you enjoy this cute card.

Linda x

Pin It Now!